The COBOL code that I was looking at used a magic value 999, and I couldn’t see where it could be coming from. After considerable head scratching, I managed to figure out that all the array structure instantiations in the code are initialized using strings. That seems to be the origin of the magic (standalone) 999’s scattered through the code.
To share the horror, here is an (anonymized) example of the offending array structure initialization
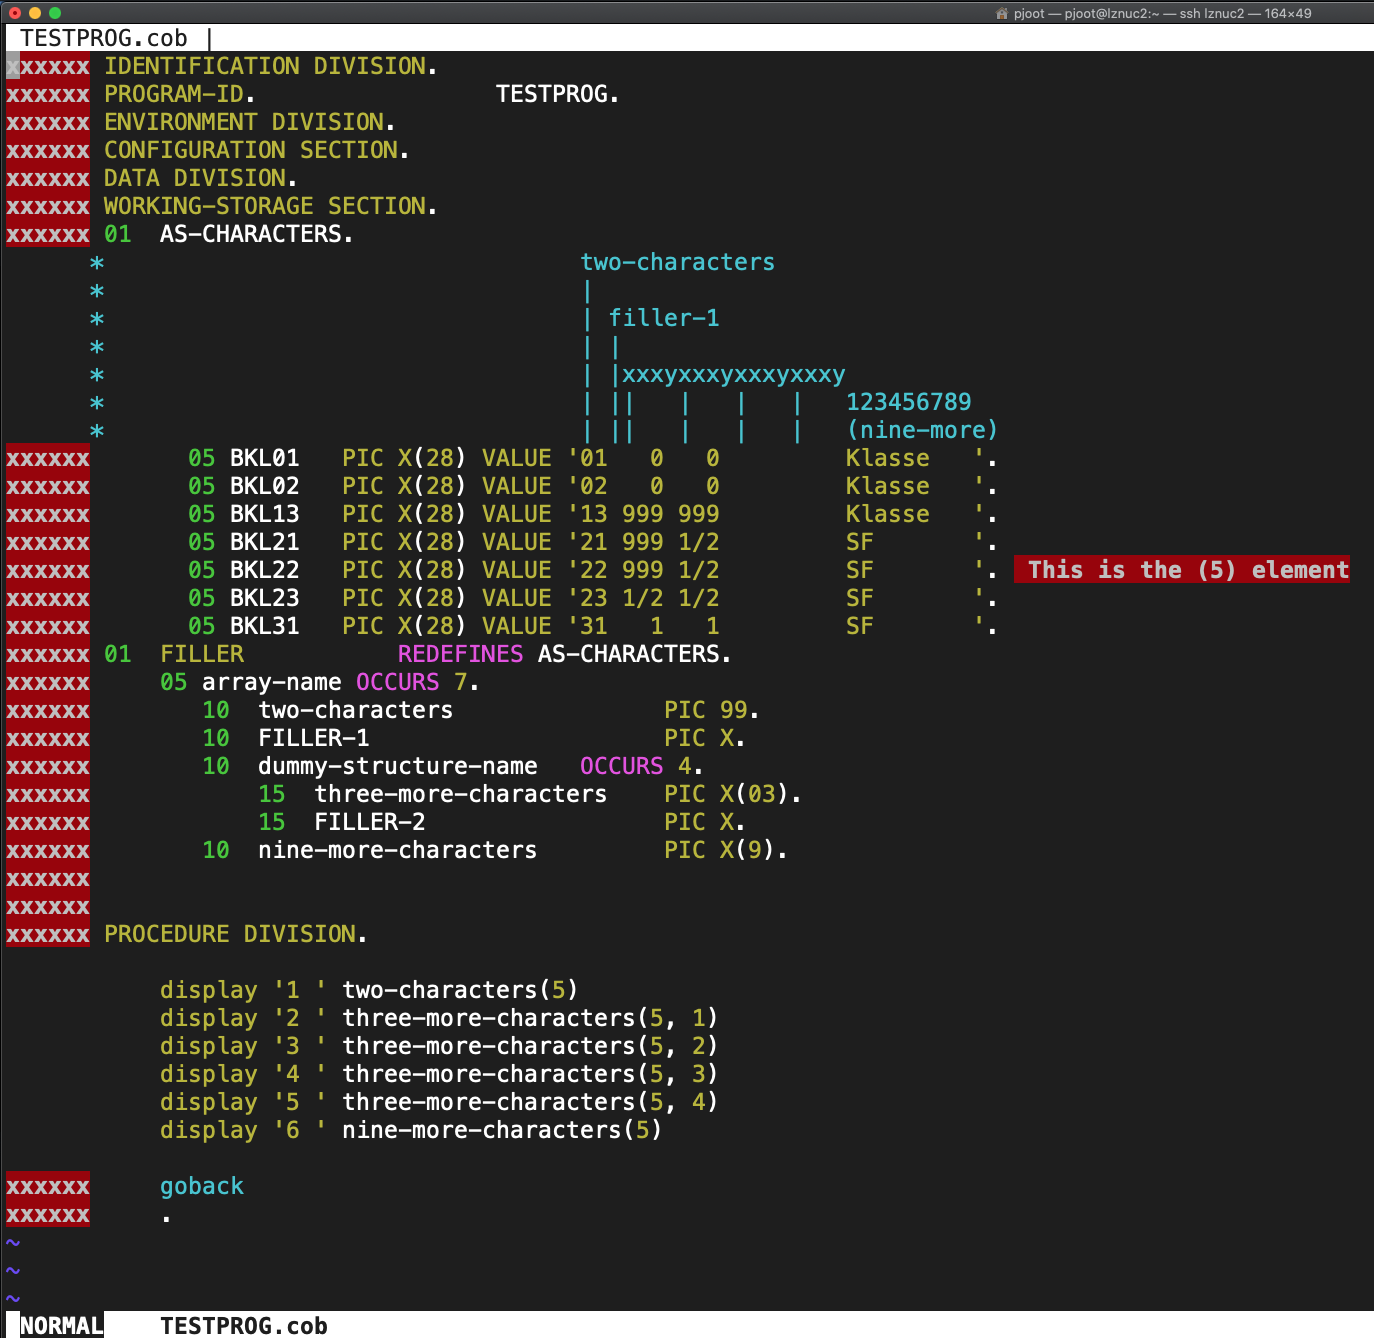
where I added in the block comment that points out each of the interesting regions of the initialization strings.
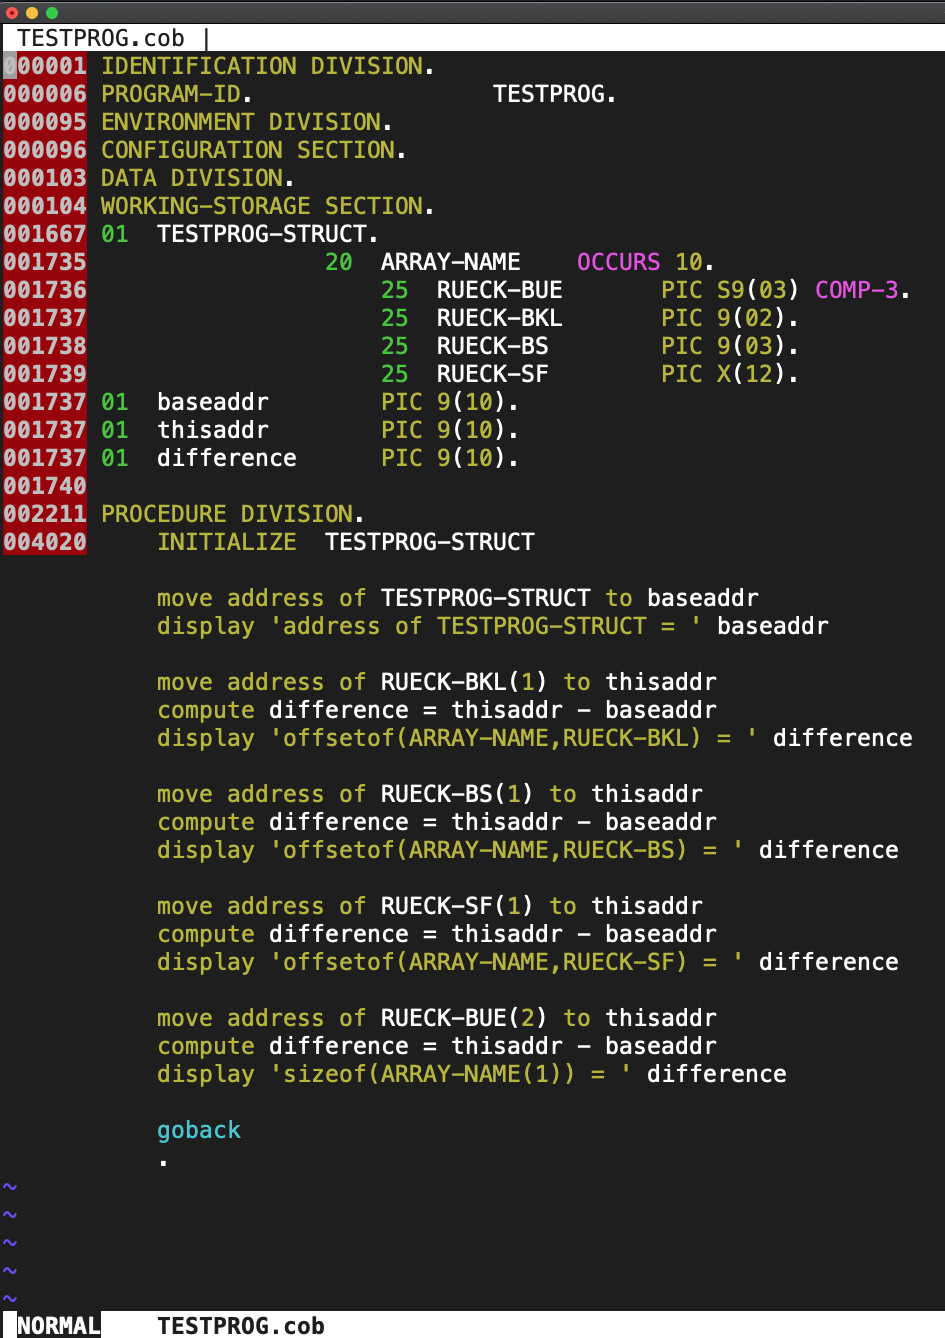
Here’s what’s going on. We have a global variable array (effectively unnamed) that has three fields:
- two-characters (numeric only)
- dummy-structure-name, containing a 3 character field and a pad.
- nine-more-characters
If you add up all the characters in this data structure we have: 2 + 1 + 4 * (3 + 1) + 9 = 28, so this array initialization is effectively done by aliasing the array elements with the memory containing a char[7][28].
My eyes are burning!
As far as I can tell, COBOL has no notion of a structure type, you just have instances of structures everywhere (they are probably called something different — a level 01 declaration, or something like that). A lot of the PL/I code I’ve seen is also like that, although in PL/I you can declare your structure types if you want to.
The display’s above make use of the fact that COBOL variables don’t have to use all the high level qualifiers (unless there is ambiguity). My SYSOUT shows that, sure enough, the (5) element of the array (COBOL arrays are one’s counted) has the values I expected:
1 22

2 999

3 1/2

4

5

6 SF
Basically, the horrendous initialization above, is as if you if declared your structure as:
struct arrayname
{
   char numeric2[2];
   char filler1[1];
   struct
   {
      char threemore[3];
      char filler2[1];
   } threepluspad[4];

   char ninemore[9];
};
and then initialized it with:
char globalmemory[7][28] = {
   // n2       f    x    x    x    y    x    x    x    y    x    x    x    y    x    x    x    y    'K', 'l', 'a', 's', 's', 'e', ' ', ' ', ' '},
   { '0', '1', ' ', ' ', ' ', '0', ' ', ' ', ' ', '0', ' ', ' ', ' ', ' ', ' ', ' ', ' ', ' ', ' ', 'K', 'l', 'a', 's', 's', 'e', ' ', ' ', ' '},
   { '0', '2', ' ', ' ', ' ', '0', ' ', ' ', ' ', '0', ' ', ' ', ' ', ' ', ' ', ' ', ' ', ' ', ' ', 'K', 'l', 'a', 's', 's', 'e', ' ', ' ', ' '},
   { '1', '3', ' ', '9', '9', '9', ' ', '9', '9', '9', ' ', ' ', ' ', ' ', ' ', ' ', ' ', ' ', ' ', 'K', 'l', 'a', 's', 's', 'e', ' ', ' ', ' '},
   { '2', '1', ' ', '9', '9', '9', ' ', '1', '/', '2', ' ', ' ', ' ', ' ', ' ', ' ', ' ', ' ', ' ', 'S', 'F', ' ', ' ', ' ', ' ', ' ', ' ', ' '},
   { '2', '2', ' ', '9', '9', '9', ' ', '1', '/', '2', ' ', ' ', ' ', ' ', ' ', ' ', ' ', ' ', ' ', 'S', 'F', ' ', ' ', ' ', ' ', ' ', ' ', ' '},
   { '2', '3', ' ', '1', '/', '2', ' ', '1', '/', '2', ' ', ' ', ' ', ' ', ' ', ' ', ' ', ' ', ' ', 'S', 'F', ' ', ' ', ' ', ' ', ' ', ' ', ' '},
   { '3', '1', ' ', ' ', ' ', '1', ' ', ' ', ' ', '1', ' ', ' ', ' ', ' ', ' ', ' ', ' ', ' ', ' ', 'S', 'F', ' ', ' ', ' ', ' ', ' ', ' ', ' '},
};

struct arrayname * p = (struct arrayname*)globalmemory;
and then and then printed:
   printf( "1 %.2s\n", p[4].numeric2 );
   printf( "2 %.3s\n", p[4].threepluspad[0].threemore );
   printf( "3 %.3s\n", p[4].threepluspad[1].threemore );
   printf( "4 %.3s\n", p[4].threepluspad[2].threemore );
   printf( "5 %.3s\n", p[4].threepluspad[3].threemore );
   printf( "6 %.9s\n", p[4].ninemore );
Of course, the use of fixed length strings without a null terminator wouldn’t ever be done in C, so a more natural equivalent (assuming one doesn’t care about the specific memory equivalence of the two representations, and can tolerate null terminators instead of spaces) would just be something like:
struct arrayname
{
   char numeric2[3];
   struct
   {
      char threemore[4];
   } threepluspad[4];

   char ninemore[9];
};

struct arrayname g[7] = {
   { "01", {"  0", "  0", "   ", "   "}, "Klasse  " },
   { "02", {"  0", "  0", "   ", "   "}, "Klasse  " },
   { "13", {"999", "999", "   ", "   "}, "Klasse  " },
   { "21", {"999", "1/2", "   ", "   "}, "SF      " },
   { "22", {"999", "1/2", "   ", "   "}, "SF      " },
   { "23", {"1/2", "1/2", "   ", "   "}, "SF      " },
   { "31", {"  1", "  1", "   ", "   "}, "SF      " }
};
You could argue that the COBOL way isn’t so bad once you’ve seen the pattern, and is only cosmetically different from the natural C analogue. That is, if you ignore the fact that there is no separation of fields in the initializer strings, and that you have to name a whole bunch of dummy initializer objects and fill characters, and the fact that any semblance of typing is completely obliterated.
The code in question is also complete spaghetti, with GOTO all over the place. Perhaps COBOL versions after COBOL77, which is what I assume I’m looking at, added loops and better initialization syntax?